Monday, August 31, 2009

Adding Adsense to your blogs

As a blog owner, your site is prime real estate on the Internet. You can place codes on your site to display ads that might be of interest to your visitors.

Google AdSense is a free program that enables website publishers of all sizes to display relevant Google ads and earn.


You must sign up for Google AdSense account before you can display ads on your blog. Take some time to explore the Google Adsense program details on that site

To put the adsense codes on your blog, you need to sign on to your blog, click Layout > Page Elements.


Click 'Add Gadget' and select 'Adsense'. Configure your adsense ads by choosing the Format and colour scheme of your ads. Lastly decide where you want to place the ad (left, right, footer, header etc).

Besides AdSense codes, you can also add other gadgets, like a poll, video, list of favourite books, list of favourite sites, etc.


Read more...

Changing from 2 column to 3 column templates

There are several sites which offers free blogger templates, other than those offered by default in Blogger.com. I want a template with 3 column.

Previously I visited Blogcrowds, but somehow today I wasnt't successful in downloading any of the templates there. I scoured another site BloggerBuster and found the template I want.


I downloaded the 3 column template for Rounders 3 from the BloggerBuster website, and then uploaded it to my blog. The result is what you see now.


Take note that in the process of uploading a new template, any widgets (special application) you've added will be deleted. You will have to add the codes again.

Sob, I have to add the HTML codes for the 'read more' hack again.
Note : may not have to add the read more codes in future because Blogger might be coming out with this feature soon!.

Lesson learnt : Try to decide on the template as early as you can, then only make other changes to the blog. That's the reason I created this blog, to document the steps and the widgets I added, so that I can replicate this process later on.


Here is a screenshot of my original 2 column blog.


If you need assistance on uploading a new template , read my earlier post on how to backup and upload a new template


Read more...

Sunday, August 30, 2009

How to add 'read more' to your blog posts

Adding a 'read more' link to your blog post will allow a reader to see a summary of the post on the main page of your blog, and invite the reader to click to read the entire full post if he is interested in the subject matter.

Here are the detailed steps on how to edit your template to enable expandable post on your blogger blog


The steps below is largely taken from the solid blogger website . Reference also made to the Blogger website.

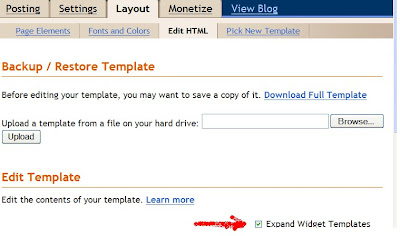
1. First of all back up your current template code. To do this navigate to Layout >> Edit HTML >> Download Full Template.

2. Expand your HTML code by ticking on Expand Widget Templates.


3. Press Ctrl+F on your keyboard and type in the code < data:post.body/ > in the Find field.


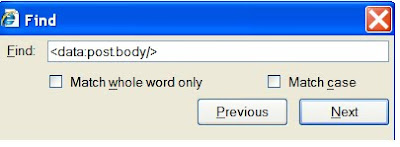
Press the Enter key and you will be able to locate the code inside your template.

4. Above the < data:post.body/ > code, you should see
either < div class=’post-header-line-1′/ >
or < div class=’post-body'>,
or both


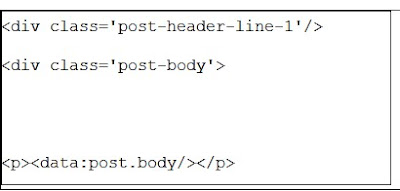
Copy and paste the following codes in the space just above the "data:post.body", and below "post-header-line" and "post-body" codes.

< b:if cond='data:blog.pageType == "item"' >
< style >.fullpost{display:inline;}< /style>
< p>< data:post.body/ >< /p >
< b:else/ >
< style >.fullpost{display:none;}< /style >


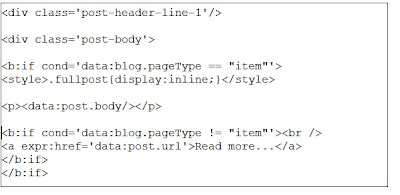
5. After adding the above codes, your HTML code should look like the below screenshot.


6. Add another piece of code below < data:post.body/>. Copy the following code and paste below < data:post.body >

< b:if cond='data:blog.pageType != "item"' >< br />
< a expr:href='data:post.url' > Read more...< /a >
< /b:if >
< /b:if >


Note : you may edit the words 'Read More' to something else, say, 'continue reading'.


7. After adding the above codes, your template should now look like the sceenshot below.


8. Click 'Save Template'. We have completed editing our blog ’s HTML code.

Note : If you get an error message when you're saving the template, then you have not added the codes correctly. Go through the steps, and rectify the errors.

9. Next, we have to edit the post element. For this go to Settings >> Formatting >> Post Template. Add the following piece of code there and save.

< span class="fullpost">
< /span>


10. You're done.

11. When writing a new post, the post template will show the codes that you've entered above, as default.

Take note:
what you write above the code < span class=”fullpost” > is your summary post, which will have the link for 'Read More' .

What you write in between the codes < span class=”fullpost” > and < /span > will be the full post that you want the reader to read.

For some post, you may want to display the full post instead of the 'read more' version, then what you do is to delete the codes in the post template when you are writing your post.

I notice that all the previous posts will also bear the 'read more' redirect at the end of the full post. Looks like you my have to edit your old posts and edit the placement of the 'read more' redirect if you want a more professional look for your blog.


Advantages of making your post expandable:
1. allow readers to scan through your blog contents quickly
2. page will load faster.
3. blog will look organised


Important note :
If you intend to change the layout of the default template, you should do that first, because the new templates will not have these codes, so they will have to be inserted again whenever you change the template layout!


Read more...

Making a backup and uploading a new template

The template that you chose for your blog during the initial setup can be edited and changed.

Before you make any changes to the template, you should make a backup.


Login to your blog
1. logon to blogger (www.blogger.com). Tip : you should bookmark this website.

2. sign in with your google account and your password

3. click 'Sign In'

4. if you have more than 1 blog already created, the dashboard will show a list of all your blogs.


To backup your template

This is the screenshot for the Backup/Restore Template for blogger blogs.


5. click the 'Layout' option for the relevant blog

6. select 'Edit HTML'

7. select 'Download Full Template'

8. save the template to you PC. Create a main folder, with subfolders for every blog. Save the template for your blog in its respective folder, and include the date in the filename, so that you can restore it if you want to.

To restore to your old template, or to change to a new template
Before you can change to a new template, you need to download the new template codes (either downloaded free from certain website, or your own custom-designed templates) to your PC first.

Repeat steps 1-6 above.
7A. Click 'Browse' button beside the field 'Upload a template from a file on your hard drive' to locate the new template codes stored in your PC.

8A. Click 'Upload' button to upload the new template codes. This will override your current template, but will leave its contents and certain settings intact.


Read more...

Why use free blogs

How often do we hear the phrase 'free things aren't good, good things aren't free'. In the case of blogs, being free does not preclude you from making money. My blogs have created money for me, and so I got money for nothing!

Free blogs have the following advantages :

    If you are just starting out, you may not be sure whether the topic you choose to blog on is something that you will continue in the future. So you may want to start with the free platform, sustain your interest level, get the readers in, and then only move into your own paid site.
    If you decide to abandon the topic, there is no money loss.
    Blogging technology keeps on changing. It is a good way to learn new skill sets without losing money. Blogger has introduced new features since I first got introduced to it about 2 years ago. There is no requirement to purchase any software to publish your contents onto your site.
    Another reason why you might want to use the free blogging platform is that there is no need to renew the services. For a paid site, if you don't renew the hosting service, you site will not be accessible.
However, there is no guarantee that the free blog will be accessible at all times, because the owners of the service has total control of it, and may decide to stop the service at their whim. So it is important for you to learn how to make a backup of your contents, so that it can be replicated if necessary.


Read more...

How to create your first Blog

Setting up a blog is easy. What's more, you can set up a blog for Free.


To create a free blog,
1. you can go to http://www.blogger.com/

This is the sign on page to create a blogger blog.


2. Since Blogger is owned by Google, you will be asked to sign in with a Google account. You will be re-directed to open a Google account if you don't have one yet.

3. Then follow the steps on the screen to create your first blog. You don't have to worry about being spot on on the blog name, the contents etc. Take your first blog as a learning experience.

4. After you've created your blog, you may want to go through the help section on the blogger.com website to get yourself familiarise yourself with blogging.

5. You can always come back to this site for tips on how to manage your blogger blogs.

6.If you prefer, you can view the video tutorial first before you create your blog. The video will teach you the basics of creating a blog.


You now have a website with the link something like this:
http://www.yourblognname.blogspot.com/


Note : besides blogger, there are also other free blog platforms like wordpress and livejournal


Read more...